Bambu Lab P1S — Fast, Enclosed & Multi-Material Ready
The Bambu Lab P1S is one of the most capable enclosed FDM printers in its class. Whether you’re printing functional engineering parts in ABS, running a small production run in PLA, or diving into multi-colour prints with the AMS, the P1S handles it with minimal fuss. It’s quick to set up, fast to print, and designed to work reliably day after day.
It’s a solid choice for hobbyists who’ve outgrown open-frame machines, small businesses needing dependable throughput, and schools or makerspaces wanting an enclosed, lower-fume environment for a wider range of materials.
Three Configurations — Pick the Right One for You
The P1S is available in three configurations. Here’s a plain-English breakdown to help you choose:
| Configuration |
Best For |
Multi-Material? |
Price |
| P1S |
Single-colour printing, functional parts, engineering filaments |
No (AMS optional later) |
A$599 |
| P1S Combo |
Multi-colour hobbyists, makers wanting colour prints now |
Yes — AMS (up to 4 colours) |
A$899 |
| P1S AMS 2 Pro Combo |
Power users, small businesses, multi-material workflows |
Yes — AMS 2 Pro (up to 4 spools, improved handling) |
A$1,129 |
Which Configuration Is Right for You?
- Choose the P1S if you mainly print single-colour functional parts, want the cleanest entry price, or plan to add AMS later.
- Choose the P1S Combo if you want to print multi-colour models right away using the proven original AMS — great for miniatures, signage, and creative projects.
- Choose the P1S AMS 2 Pro Combo if you want Bambu’s latest AMS system with improved filament handling and are printing multi-material or mixed-filament jobs regularly.
Key Features
Up to 500mm/s Print SpeedFully Enclosed Chamber300°C All-Metal HotendAuto Bed LevellingAI-Assisted Print MonitoringWi-Fi + LAN ConnectivityCarbon Fibre & Engineering FilamentsAMS Multi-Material Compatible
Full Specifications
| Build Volume |
256 × 256 × 256 mm |
| Max Print Speed |
500 mm/s |
| Max Acceleration |
20,000 mm/s² |
| Max Hotend Temperature |
300°C |
| Max Bed Temperature |
120°C |
| Layer Resolution |
0.05 – 0.35 mm |
| Nozzle Diameter (stock) |
0.4 mm (hardened steel) |
| Supported Filaments |
PLA, PETG, TPU, ABS, ASA, PA, PC, PLA-CF, PETG-CF, PA-CF, ABS-CF and more |
| Enclosure |
Fully enclosed with active temperature control |
| Bed Levelling |
Automatic (with vibration compensation) |
| Connectivity |
Wi-Fi, LAN, MicroSD |
| Camera |
Built-in 1080p — AI failure detection & remote monitoring |
| Slicer Software |
Bambu Studio (free), Bambu Handy app |
| Power Supply |
350W — AU plug included |
| Machine Weight |
17.6kg |
| Machine Dimensions |
389 × 389 × 458 mm |
What’s in the Box (Base P1S)
- Bambu Lab P1S printer (pre-assembled)
- Bambu Cool Plate + Textured PEI build plate
- 0.4mm hardened steel nozzle (installed)
- Spare nozzles and accessories kit
- MicroSD card
- Power cable with AU plug
- Sample filament spool
- Quick start guide
Combo and AMS 2 Pro Combo versions include the respective AMS unit and associated accessories. See individual variant pages for full box contents.
🇦🇺 Buying with Confidence from NE Print Shop
All Bambu Lab P1S printers sold through NE Print Shop are Australian stock, priced in AUD including GST, and ship from within Australia. Comes with an Australian power plug. Local support available — we’re here to help you get printing.
Bambu Lab P1S — Single Printer
The Bambu Lab P1S base model gives you everything you need for fast, high-quality FDM printing in an enclosed, temperature-controlled environment. It’s the most affordable entry into the P1S ecosystem — and you can always add an AMS later if your needs change.
This configuration prints single-colour jobs in a huge range of materials including ABS, ASA, PA, PC, and carbon-fibre composites that require an enclosed chamber to print reliably. At up to 500mm/s with AI print monitoring and automatic bed levelling, it’s significantly quicker and more capable than most printers in this price range.
Who Is This For?
- Makers and hobbyists wanting a fast, reliable enclosed printer without the multi-colour complexity
- Small businesses printing functional parts in engineering-grade filaments
- Schools and makerspaces needing a low-odour enclosed machine for ABS/ASA
- Anyone who wants to add AMS later when the budget allows
Key Specs
| Build Volume |
256 × 256 × 256 mm |
| Max Print Speed |
500 mm/s |
| Max Hotend Temp |
300°C |
| Enclosure |
Fully enclosed |
| Multi-Colour |
Single colour (AMS compatible, sold separately) |
| Connectivity |
Wi-Fi, LAN, MicroSD |
| Camera |
1080p with AI monitoring |
| Price |
A$599 inc. GST |
🇦🇺 Australian Stock — Ships from Australia
Price is in AUD and includes GST. Comes with an AU power plug. Sold and supported by NE Print Shop — an Australian 3D printing retailer.
Bambu Lab P1S Combo — With AMS
The P1S Combo bundles the P1S printer with Bambu Lab’s original Automatic Material System (AMS), giving you multi-colour printing capability right out of the box. Load up to four filament spools and let the AMS handle automatic switching between colours mid-print.
This is the sweet spot for hobbyists who want to print detailed multi-colour models — think miniatures, signs, logos, or decorative parts — without manually swapping filament. The AMS connects directly to the P1S and integrates seamlessly with Bambu Studio for multi-colour slicing.
What’s Included Over the Base P1S
- Bambu Lab AMS unit (supports up to 4 filament spools)
- AMS connecting hub and cabling
- All accessories included with base P1S
Who Is This For?
- Hobbyists and makers wanting multi-colour prints without manual swaps
- Miniature painters looking for pre-coloured prints to cut down on painting time
- Anyone creating branded, multi-colour functional parts or signage
- Those wanting the original AMS at a well-priced bundle
Key Specs
| Build Volume |
256 × 256 × 256 mm |
| Max Print Speed |
500 mm/s |
| Max Hotend Temp |
300°C |
| Enclosure |
Fully enclosed |
| Multi-Colour System |
Bambu Lab AMS — up to 4 colours |
| Connectivity |
Wi-Fi, LAN, MicroSD |
| Camera |
1080p with AI monitoring |
| Price |
A$899 inc. GST |
🇦🇺 Australian Stock — Ships from Australia
Price is in AUD and includes GST. Comes with an AU power plug. Sold and supported by NE Print Shop — an Australian 3D printing retailer.
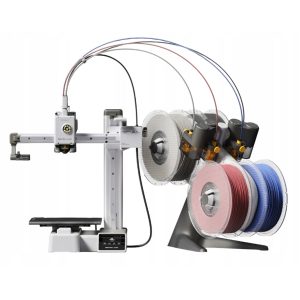
Bambu Lab P1S AMS 2 Pro Combo
The P1S AMS 2 Pro Combo pairs the P1S with Bambu Lab’s latest AMS 2 Pro — an upgraded multi-material system designed for improved filament handling, better material compatibility, and a more refined multi-colour workflow. This is the top-tier P1S configuration and the right pick if you’re printing multi-material jobs regularly or want the most capable setup available.
The AMS 2 Pro brings notable improvements over the original AMS, including enhanced filament detection, better moisture management, and smoother performance with a wider range of filament types. If you’re printing flexible, abrasive, or mixed-type filaments across the same job, the AMS 2 Pro handles it more confidently.
What’s Included Over the Base P1S
- Bambu Lab AMS 2 Pro unit (supports up to 4 filament spools)
- Improved filament buffering and detection over original AMS
- Better support for flexible and abrasive filaments in multi-material setups
- AMS 2 Pro connecting hub and cabling
- All accessories included with base P1S
Who Is This For?
- Power users who print multi-material or multi-colour jobs frequently
- Small businesses wanting the most reliable and capable AMS setup
- Makers working with mixed filament types (e.g. PLA + TPU, PLA + support material)
- Those who want Bambu Lab’s latest and most refined AMS technology
Key Specs
| Build Volume |
256 × 256 × 256 mm |
| Max Print Speed |
500 mm/s |
| Max Hotend Temp |
300°C |
| Enclosure |
Fully enclosed |
| Multi-Colour System |
Bambu Lab AMS 2 Pro — up to 4 spools, improved handling |
| Connectivity |
Wi-Fi, LAN, MicroSD |
| Camera |
1080p with AI monitoring |
| Price |
A$1,249 inc. GST |
🇦🇺 Australian Stock — Ships from Australia
Price is in AUD and includes GST. Comes with an AU power plug. Sold and supported by NE Print Shop — an Australian 3D printing retailer.
Nour Engineering Solutions accepts returns or refunds for change of mind or wrong items ordered within 30 days from the purchase date. Customers need to return the items to Nour Engineering Solutions, ensuring the items are in brand new, unused condition. Customers will also be charged for the cost of the original shipping and a re-stocking fee equal to 10% of the order value.
In case of items arriving damaged or wrong items being sent to the customer, Nour Engineering Solutions will be responsible for either exchanging stock for the customer or issuing a refund.
In the case of defective returns, refunds will only be issued after the items are returned to Nour Engineering Solutions. Nour Engineering Solutions will be responsible for the return postage, and the customer should provide reasonable assistance for the defective items to be picked up by courier, such as packing the items and printing shipping labels.
Once the order is dispatched, it is the customer’s responsibility to follow up the shipment. If the items arrive damaged, the customer should notify Nour Engineering Solutions within 2 business days after receiving the order. If the item does not arrive within 2 business days of the expected delivery date, the customer should notify Nour Engineering Solutions immediately. Nour Engineering Solutions may refuse to refund or exchange items if the customer fails to do so.
In case the first delivery attempt is unsuccessful, the parcel will be forwarded to the local Post Office or News Agency. Failure to pick up parcels within the required timeframe may result in the parcel being returned to Nour Engineering Solutions. In this case, customers will be responsible for the costs associated with re-sending the parcel.